You’ve done it again: “it” being a manicure, that is. And in a few weeks, those perfectly lacquered chicklets will leave little half-moons of a bare nail in their wake, and you’ll have to take it all off and do it all again. It’s a cycle of polish, remover, polish, remover that you can’t seem to break—and, sure, gel polish exists, but it can’t stop your nails from growing out! It’s… exhausting.
That’s why a new wave of nail styles only bother taking up a little of your precious nail real estate—and you’ll be seeing the technique all over come summer. It’s the best option for when you have other things to worry about: no more awkward chips or grown-out bases, just the color, shine, and general put-together-ness you already love about having a manicure.
Lest you think a partial manicure sounds boring, I rounded up five of my favorite examples from Instagram that are anything but. (They’re ranked by skill level, so you can keep it easy or take on a challenge.) And if the DIY approach isn’t your thing, you can always bring a photo to your favorite nail tech for help—the beauty of the style is that it works just as well on every finger as when it’s just an accent. With you as the base color, you can make your own rules.
Level 1: A Minimalist Approach
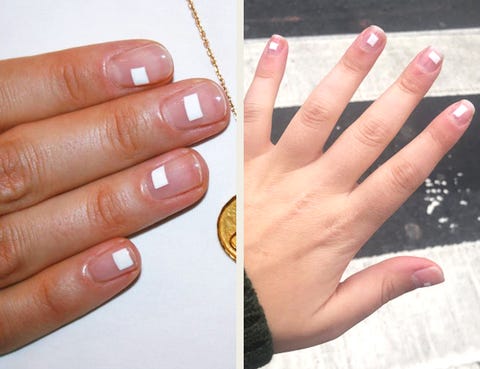
This is the style to convert even those who prefer a bare nail to a polished one. And it’s the easiest to accomplish on your own! Just like how Scotch tape can help perfect your eyeliner, you can use it to make chic, geometric designs without worrying about being too precise. This style works best with solid, classic polish shades—Imarni did it in white, but I think it would just look good in a glossy black or classic red.
How to: Tape four pieces of Scotch tape together to form the outline of a small rectangular window. It helps if you do all five (for your five fingers on each hand!) at once, so you don’t have to wait for each nail to dry. Then, adhere to the tape, so the windows lay flat on your nails. Once they’re flat, swipe your nail polish—I used Tenoverten’s White—over the top. You don’t have to be careful about your application technique since the tape acts as a shield for the negative space. Once they’re dry, peel off the tape and cover with topcoat.
Inspired by: Imarni Nails
Level 2: The Unexpected French
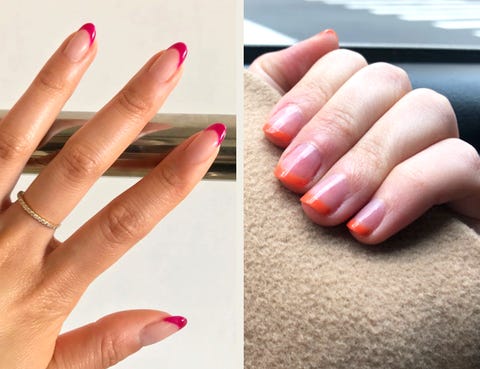
If French manicures conjure up bad memories of the early aughts, consider 2020’s fresh take: instead of a chalky white, paint the tips of your fingers with the colors of the rainbow. The look works best on long-ish nails, and you can either keep it monochrome or experiment with different Skittles shades.
How to: Starting with bare nails, take your color of choice (I used Amarillo Highway from Death Valley Nails) and wipe off most of the polish on the brush for maximum control. Going slowly, place the brush halfway on your nail and halfway off, and sweep a line from the outer corner to the middle. Repeat on the other side, and then on each nail. Clean up any excess with nail polish remover on a Q-tip, and finish with topcoat.
Inspired by: Fong Min Liao
Level 3: The One That Uses A Pen
The Foundrae jewelry designer’s Instagram is flooded with her easy manicure styles. And you can copy the style at home with a nail polish marker, like Sally Hansen’s I Heart Nail Art Pens. The simple designs skew more bohemian than minimalist (thanks to their likeness to delicate finger tattoos), and you can experiment with different patterns: dots, chevrons, and simple lines are all fair game.
How to: Like when you get a new Tide pen, these nail art pens take a few pumps for the color to reach their felt tips. But once the polish is flowing, use a light hand—it’s runnier and more opaque than traditional bottled shades. Two dots (one bigger, one smaller) looks uber cool, and you can mix them with different lines and squiggles. Have fun! Once you’re finished doodling, finish with topcoat.


